Showing posts with label craft. Show all posts

Wednesday, June 29, 2011

Summer Craft for Kids: Butterfly Gift Bag

Butterfly Wood Gift Bag
Have you been invited to a children's birthday party? Or are you planning a party and need an idea for goodie bags? This butterfly wood gift bag is so easy to make and can be a fun summer craft project for kids!


Supplies:

  • Glue Dots®: Micro, Permanent, Glue Lines
  • Our Craft Lounge: Blue-Berry Crafty Sparkles
  • wood gift box ($1 at Michaels)
  • painted carved wood butterfly ($.99 at Michaels)
  • white acrylic paint
  • paint brush
  • black ribbon


1. Apply two coats of white paint on the wood gift box. Let dry.

2. Adhere black ribbon to the box using Glue Lines® and tie a bow on the front handle.

3. Use Permanent Glue Dots® to attach the butterfly to the front of the box.

4. Place two Micro Glue Dots® on top of the butterfly's eyes, sprinkle on Crafty Sparkles and remove the excess.


Insert gift (or goodies) and you're done! Try these other Glue Dots projects:


Disclosure: This blog post was written while participating on the Glue Dots design team.

Wednesday, June 22, 2011

Glue Dots 4th of July Craft Project: Patriotic Bird House

America is another name for opportunity.
Our whole history appears like a last effort of 
divine providence on behalf of the human race.  
-Ralph Waldo Emerson


What screams America more than the colors red, white and blue? If you are searching for a little 4th of July craft project, look no further! Turn a ready-to-finish bird house into a patriotic decoration by following the simple steps below.

Supplies:

  • Craft Glue Dots®
  • wood bird house
  • 7 wood stars
  • small decorative bird
  • acrylic paint (red, white, blue, yellow)
  • paint brushes
  • emery board


1. Lightly sand the bird house with an emery board.


2. Paint the bird house: white for the base, red and white stripes on roof, blue for the main part of the house, and red on the perch.


3. Paint both sides of the stars yellow.


4. After the paint dries, use Craft Glue Dots® to adhere the stars to the front of the roof.


5. Pull the clip out of the bird (if there is one) and attach bird to the perch with a Craft Glue Dot®.


Note: Apply 2-3 coats of paint for each color and allow dry time in between coats.


Other Glue Dots Projects:


Disclosure: This post was written while participating on the Glue Dots design team.

Wednesday, June 8, 2011

Father's Day Project: D is for Dad Wood Plaque

Special Announcement: There will be Layout A Day Blog Hop tomorrow (June 9, 2011) starting at EcoScrapbook, taking blog hoppers through eight other blogs sharing favorite layouts and experiences during May's LOAD. Join us!

"D is for Dad" Father's Day Project
Father's Day is just around the corner and here's a simple project for that special man in your life.

Supplies:

Glue Dots®: Permanent, assorted (I used Glue Lines and Mini)
wood plaque
wood letter "D"
chipboard letters
black marker
acrylic paint (I used black, white, blue)

1. Paint the wood plaque, wood letter and chipboard letters. Allow drying time between coats.

2. Adhere the wood "D" to the plaque using Permanent Glue Dots® and the chipboard letters using Glue Dots®.

3. Write "is for" lightly on the plaque with a pencil, then go over it with a black marker. Erase the pencil lines after the marker dries.

Optional: Add hooks to the back to hang plaque on a wall.

Easy-peasy!

Other Glue Dots® Projects:

Disclosure: This post was written while participating on the Glue Dots design team

Thursday, May 12, 2011

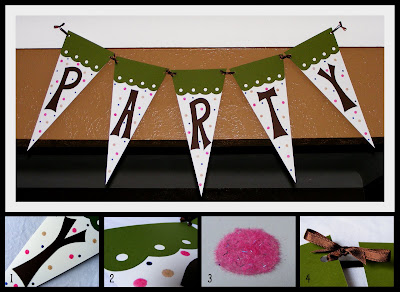
Make a Party Banner with Glue Dots

Party Banner Tutorial
Are you planning a birthday party soon (like me)? Or maybe a special event in the summer? Then this party banner is just for you. 

Supplies:
Glue Dots®: Mini, Memory Book
Our Craft Lounge: Sparkly Fluff (Rockin Pink, Brown Sugar) and Crafty Sparkles (Blue-Berry)
pre-made paper pennants (I found a 5-pack at the Dollar Tree)
cardstock (brown, green)
hole punches
ribbon
craft knife
scissors


Step 1. Make letters. Use a pencil to draw the outline of each letter onto brown cardstock, then cut with scissors and a craft knife. Adhere a letter to each pennant with Memory Book Glue Dots®.

Step 2. Create a border. Make a template for the border design on cardboard and cut out. Use the template to trace the border onto green cardstock. Punch out circles with a hole punch as shown in the photo before using Memory Book Glue Dots® to attach the border to the pennants.

Step 3. Add Sparkle. Place Memory Book Glue Dots® all over each pennant, sprinkle the Rockin Pink and Brown Sugar Sparkly Fluff onto the adhesive and shake off excess. Add Mini Glue Dots in the empty spaces, sprinkle Blue-Berry Crafty Sprinkles over top and remove excess. (Note: A paint brush is useful in removing extra sparkles.)

Step 4. Connect the pennants. Punch two holes in the top corners of each pennant. Connect each piece with ribbon, making two knots and a bow.

Now you have a party banner that's perfect for the summer, birthdays or any fun occasion! 

Related posts:
Disclosure: This blog post was written while participating on the Glue Dots design team.

Friday, December 10, 2010

Wedding Favor Idea Using the Kanji Symbol for Love

"Love and marriage go together
like a horse and carriage." 
-Sung by Frank Sinatra

 Kanji Love Symbol Wedding Favor Box
Instead of spending tons of money on wedding favors from a store, you can create your own custom-made wedding favor boxes using the kanji symbol for love.

Supplies:

  • Small wood box with window
  • Glue Dots®: Micro, Continuous Line
  • White paint
  • Black acrylic jewels
  • Black ribbon
  • Black marker*
  • White paper
  • Paper Trimmer
*I chose to write love in Japanese kanji using a marker, but you can also purchase a kanji love stamp or use kanji font in a word application and print.

Instructions are for one wedding favor box.

1. Paint the box. Let dry and apply a second coat.

2. Cut a square to fit into the window of the box and write the kanji love symbol with black marker onto the paper. (Tip: Lightly write the symbol with pencil first before using the marker.) Once the box is dry, place the square into the window.

3. Adhere the acrylic jewels around the window on top of the box and on the closure with Micro Glue Dots®.

4. Wrap a Continuous Glue Line® around the box and attach the ribbon.

There you have it! A beautiful black and white wedding favor box showcasing the kanji symbol for love.

Thanks for stopping by Snap.Scrap.Blog.Tweet!

You may also be interested in:
Disclosure: I wrote this post while participating on the Glue Dots design team.

Posted by Picasa