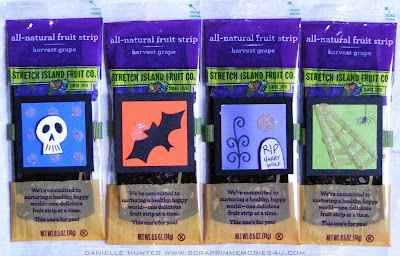
Trick-or-Treat, smell my feet
Give me something good to eat
If you don't, I don't care
I'll pull down your underwear!
When it comes to getting crafty, my comfort zone is centered around scrapbooking and paper in particular. I enjoy making little embellishments and titles and often turn to Glue Dots® adhesive for adding that special touch...a pop, a dot, a line. And when I got my hands on Sparkly Fluff from OurCraftLounge.net, I knew that it would be a perfect companion to Glue Dots®. I experimented with Sparkly Fluff for the first time when I created my serial killer scrapbook layout and wanted to have more fun with it...
Supplies:
- Glue Dots® adhesive: Pop Up
, Mini
, Continuous Line
, Glue Lines
, Removable
, Memory Book
- Sparkly Fluff from OurCraftLounge.net
- American Crafts memory marker
- scrap paper
- sharp scissors
- square punch
- Fruit strips (I used Stretch Island Fruit Co
. instead of something loaded with high fructose corn syrup. They are a healthier option, made from apple, grape and pear puree concentrate with nothing else added.)
- 5" ribbon strips (cut strips longer if you decide to use candy bars)
Step 1: Go through your scrap paper and find an assortment of colors. I chose orange, blue, green and purple and used my square punch to make 8 squares (you can make more if you wish). Then I cut 8 1.75" black squares to mat the smaller squares (put aside and attach later).
Step 2: Make Halloween scenes on your squares using Glue Dots® and Sparkly Fluff. Add a Glue Dot®:
Press the Glue Dot® into the Sparkly Fluff or sprinkle it on the dot.
The Sparkly Fluff is very soft and easy to work with.
Tap off the excess Sparkly Fluff.
Then blow off any additional Sparkly Fluff.
Step 3: Decorate the squares with Continuous Glue Lines®. I made a spider web by attaching the lines to the square and cut them with sharp scissors as needed.
Then I sprinkled the Sparkly Fluff on top and removed the excess.
Here are all the squares after applying the Glue Dots® adhesive and Sparkly Fluff:
Step 4: Finish decorating the squares. Grab those black mats from earlier, make mini tombstones, bats and skulls with paper (or try making candy corn, pumpkins, ghosts, etc.) and attach them to the squares with Glue Dots® adhesive.
Tip: Roll a Glue Dot® up like a burrito. I've done this when I've run out of Glue Lines® or Pop Up Glue Dots® and can't make it to the store.
Tip: Use Glue Lines® to add a little pop to an embellishment. Glue Lines® also work great to make hidden pockets on a scrapbook page.
Tip: Use Pop Up Glue Dots® to add a 3D effect to an embellishment. If the item is too small to fit a Pop Up®, you can cut the dot to the size you need.
Step 5: Wrap ribbon around the treats and stick the ends together with Mini Glue Dots®.
Use Glue Lines® to adhere the squares to the ribbon.
And we're done!
Thanks for stopping by ScrappinMemories4U.com!
You may also be interested in:
- The Retweetables: Halloween Edition
- Mix a little gore with a few screams, add a dash of sparkle and you have a scrapbook layout
- Crafting with Glue Dots
Disclosure: I wrote this blog post while participating on the Glue Dots design team. OurCraftLounge.net provided me with Sparkly Fluff. My opinions are honest and I would never persuade you to purchase something I didn't like. Links going to Amazon.com are part of an affiliate program.


