Showing posts with label crafty. Show all posts

Tuesday, November 23, 2010

A Scrapbooker's Christmas Wish List

Dear Santa,

With Christmas just around the corner, I'm sure you and your elves have been busy making gifts for the children of the world. I bet you've checked your list a couple times and by now, you would have seen that I made the list of good boys and girls (I hope). To make your gift giving easier this year, I've put together a list of things (with photos like I did when I was little) that I wish to open on Christmas morning.


1. Bamboo Craft Tablet by Wacom: I will always be a traditional scrapbooker at heart, but there is something about digital scrapbooking and photo editing that gets me excited. I am finally to the point where I don't fear digital scrapbooking and when I saw the Bamboo Craft Tablet, I knew it would help me make the transition into the digital realm. You know what's even cooler? It comes with Adobe Photoshop Elements 7.0, Corel Painter Essentials 4.0 and an offer from Shutterfly for a free scrapbook! Wacom's Bamboo Craft Tablet is my ultimate wish list item and if I only receive this, I'll be a very happy gal.

Wacom Bamboo Craft Tablet 

2. Papermaking Kit by Arnold Grummer: As I expand my scrapbooking skills, why not try to make paper too? I've been saving my paper scraps for years, wishing that I  could open a papermaking kit on Christmas morning, but have been repeatedly disappointed...maybe this will be the year (hint hint, Santa).

Arnold Grummer Papermill Complete Papermaking Kit with DVD

3. Cinch Book Binding Tool by We R Memory Keepers: Since I'm hoping to make my own handmade paper, I should also be able to turn the paper into scrapbooks with a nifty book binder. I have plenty of cardboard just waiting for a tool that can easily punch holes and cinch wires...and I will share it with my girls so they can make their own books too.

Cinch Book Bindery Tool

4. Polaroid PoGo Instant Mobile Printer: I take a lot of photos from my cell phone and use them in my scrapbooks. It is such a pain and time-consuming task to send or download and upload all of my pics. Why not make it easier with a little device that hooks up to my phone and prints 2x3 photos?!? (And guess what? It works with my digital camera too!)

Polaroid CZA-10011B PoGo Instant Mobile Printer (Black)

5. Simple Times: Crafts for Poor People: I'm crafty and poor so this book by Amy Sedaris is right up my alley. After reading the book review on Craft Ideas Weekly, "Simple Times" will definitely be a nice break from scrapbooking (and experimenting with digital scrapbooking) and maybe I will learn a thing or two.

Simple Times: Crafts for Poor People


6. Copic Markers: I first heard of Copic Markers on Twitter and ignored the first few tweets, but as I began to see more and more artsy people talk about them, the markers sparked my interest. I love to doodle on my scrapbook pages and these Copic Markers are bright, bold and can be used to add watercolor effects. Fun stuff, huh?

Manga Primary Kit - Copic Ciao Set (8 Marker + 1 Multiliner Pen) 

So, Santa, what do you think? Have I been a good enough girl this year to receive what I want for Christmas? I can't wait to see what you'll bring me!

Thanks,
Danielle

P.S. I'll be sure to leave you cookies and milk. Just look for the holiday chalkboard and you'll find the special treats!

In case you lose my list, you can see it on my blog, Snap.Scrap.Blog.Tweet. Thanks for looking!

Monday, November 8, 2010

How to Make a Holiday Chalkboard with Glue Dots®


It's never too early to start decorating for the holidays and a festive chalkboard is a great way to welcome guests or leave Santa a message on Christmas Eve night.

Supplies:


1. Paint the plaque with chalkboard spray paint. Let dry and apply a second coat.

2. Apply two coats of white acrylic paint to the base of the wood plaque, allowing drying time between coats.

3. Apply a light coat of acrylic paint to the wood tree. Once dry, trace the outline of the tree onto a piece of holiday themed paper, cut and adhere the paper to the tree using Mini Glue Dots®. Put aside.

4. Tie ribbon along the left side of the plaque and around the dowels. Wrap Continuous Glue Lines® around the base and adhere another piece of ribbon.


5. Cut a second sheet of holiday themed paper to 3.25 x 4.25 inches. Distress and ink the edges of the holiday themed paper and notecard. Grab the tree from Step 3 and the leftover supplies to create a chalkboard decoration. Use Craft Glue Dots® to attach all the embellishments together and onto the chalkboard.


6. Use chalk to write a message.

Thanks for stopping by ScrappinMemories4U.com!

You may also be interested in:


Disclosure: I wrote this blog post while participating on the Glue Dots design team.


Posted by Picasa

Thursday, November 4, 2010

Photo Puzzle Blocks: A Perfect Gift for (Almost) All Ages

Q: What happens when photos, paper and Glue Dots® get together with wood blocks? 
A: A photo puzzle is born!


These photo puzzle blocks make the perfect gift for kids 3 to 93! The puzzle is easy to make and can be completed in a few hours, including drying time. Here's what you'll need to do:

Gather Supplies:

1. Cut a photograph into 12 1" squares.
 
2. Adhere the squares to the wood blocks by placing one Craft Glue Dot® into the center of each square and Mini Glue Dots® on each corner.
 
3. Repeat Steps 1 & 2 with the remaining photographs and paper.
 
4. Gently sand the edges of each wood block. (This is optional, but will help clean up the edges and mask imperfections.)
 
5. Brush a light coat of decoupage onto the blocks to seal them and let dry. Repeat if necessary.

A simple and thoughtful gift for children or loved ones, photo puzzle blocks are sure to provide a few smiles and endless fun.

Thanks for stopping by ScrappinMemories4U.com! Be sure to visit tomorrow for my weekly Twitter post which will feature design team calls!

You may also be interested in:
Disclosure: I wrote this blog post while participating on the Glue Dots design team.

Posted by Picasa

Thursday, October 28, 2010

The Retweetables: Inspired by Halloween Tweets

"I've seen enough horror movies to know that any 
weirdo wearing a mask is never friendly." 
-Elizabeth, Friday the 13th Part VI: Jason Lives (1986)

Horror movies were a big part of my life growing up. My family and I watched scary, bloody, gorey and spine-tingling movies more than any other genre. Maybe that's why I love Halloween so much and why I've done four straight weeks of Halloween-themed Retweetable Tweeter posts (say that five time fast).

Twitter has been streaming with endless links to Halloween crafts, costumes and scary stories and without it, I probably wouldn't have seen a tweet about a pumpkin photo centerpiece that inspired me to do this:


The tweet was listed in my post, The Retweetables: Halloween Edition, and leads to the blog post Pumpkin Photo Centerpiece Holds Your Autumn Memories by Camille Dawn (and was featured on the AlphaMom blog). It's not often that I get inspired to change up my pumpkin carving routine, but when I checked out the post, I knew I wanted to hammer some nails into a pumpkin and decorate it with twine and photographs. Seriously, this was truly cool and unique and I had to do it. And since we bought three pumpkins, I was still able to carve one along with my oldest daughter, who gutted and carved a pumpkin all on her own for the very first time:

I used the fireworks setting on  my camera to capture this shot.
Another tweet from my first Halloween Edition (links to the The Scrap Shoppe blog post Spooky Chic Halloween Wreath) made me do this:


The skull was already sparkling with glitter, but I used Pop-Up Glue Dots® to add the green buttons for the eyes (I would have done red, but I didn't have any of the right size-even my oldest daughter told me I should have used red). Makes it look freakier, right? Yet, no matter what, I still have to hide the skull since it scares my youngest and she wouldn't even enter the room when it was displayed. (Kind of like how she's freaked out by masks. Read about that HERE.)

Were you inspired by any Halloween tweets this year? Share your thoughts below and if you made anything crafty, feel free to add your link.

I'm leaving you today with a link to a few laughs...and guess where I first heard about it?!? On Twitter, of course! Here's the latest #retweetable tweeter who tweeted about Halloween (let's try saying this one five times fast):
  • @Time: The 20 best Halloween costumes | http://su.pr/1tPQyg [Still don't know what you're going to be for Halloween? This may help if you have a sense of humor.]

Thanks for stopping by ScrappinMemories4U.com! Hope you have a safe (and fright-filled) Halloween weekend! 

You may also be interested in The Retweetables: Halloween Editions

Thursday, October 21, 2010

The Retweetables: Halloween Edition (Part Three)

halloween Made with My Cool Signs.Net

When I think of Halloween, visions of pumpkins and Michael Meyers parade around in my head. I think of my childhood and eating candy until my belly ached, bobbing for apples, pumpkin seeds, haunted houses and oh, the decorations. It's hard to be uninspired at a time when it's okay to be someone you're not like a serial killer or a naughty nun (*giggle* I'm dressing up in a sexy nun costume this year). And it's super easy to be inspired by this week's #retweetable tweeters:
Thanks for stopping by ScrappinMemories4U.com!

You may also be interested in:


Tuesday, October 12, 2010

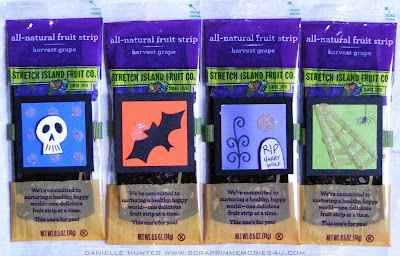
You know you're a Glue Dot® when you can decorate Halloween treats like no other adhesive

Trick-or-Treat, smell my feet
Give me something good to eat
If you don't, I don't care
I'll pull down your underwear!


When it comes to getting crafty, my comfort zone is centered around scrapbooking and paper in particular. I enjoy making little embellishments and titles and often turn to Glue Dots® adhesive for adding that special touch...a pop, a dot, a line. And when I got my hands on Sparkly Fluff from OurCraftLounge.net, I knew that it would be a perfect companion to Glue Dots®. I experimented with Sparkly Fluff for the first time when I created my serial killer scrapbook layout and wanted to have more fun with it...


Supplies:

Step 1: Go through your scrap paper and find an assortment of colors. I chose orange, blue, green and purple and used my square punch to make 8 squares (you can make more if you wish). Then I cut 8 1.75" black squares to mat the smaller squares (put aside and attach later).

Step 2: Make Halloween scenes on your squares using Glue Dots® and Sparkly Fluff. Add a Glue Dot®:


Press the Glue Dot® into the Sparkly Fluff or sprinkle it on the dot.


The Sparkly Fluff is very soft and easy to work with.


Tap off the excess Sparkly Fluff.


Then blow off any additional Sparkly Fluff.


Step 3: Decorate the squares with Continuous Glue Lines®. I made a spider web by attaching the lines to the square and cut them with sharp scissors as needed.


Then I sprinkled the Sparkly Fluff on top and removed the excess.


Here are all the squares after applying the Glue Dots® adhesive and Sparkly Fluff:


Step 4: Finish decorating the squares. Grab those black mats from earlier, make mini tombstones, bats and skulls with paper (or try making candy corn, pumpkins, ghosts, etc.) and attach them to the squares with Glue Dots® adhesive.

Tip: Roll a Glue Dot® up like a burrito. I've done this when I've run out of Glue Lines® or Pop Up  Glue Dots® and can't make it to the store.


Tip: Use Glue Lines® to add a little pop to an embellishment. Glue Lines® also work great to make hidden pockets on a scrapbook page.


Tip: Use Pop Up Glue Dots® to add a 3D effect to an embellishment. If the item is too small to fit a Pop Up®, you can cut the dot to the size you need.


Step 5: Wrap ribbon around the treats and stick the ends together with Mini Glue Dots®.

Use Glue Lines® to adhere the squares to the ribbon.


And we're done!


Thanks for stopping by ScrappinMemories4U.com!

You may also be interested in:
Disclosure: I wrote this blog post while participating on the Glue Dots design team. OurCraftLounge.net provided me with Sparkly Fluff. My opinions are honest and I would never persuade you to purchase something I didn't like. Links going to Amazon.com are part of an affiliate program.

Posted by Picasa