Showing posts with label eco-friendly craft. Show all posts

Friday, October 19, 2012

EcoScrapbook: A Green Scrapbooking & Craft Blog

Does eco-friendly scrapbooking interest you? Do you like to use recycled or repurposed items when you craft? If you're a "green" scrapbooker or crafter, check out EcoScrapbook for plenty of upcycled craft tutorials and ecoscrapbook layouts:

EcoScrapbook.com: An Eco-Friendly Scrapbooking & Craft Blog

Here's a list of popular posts you won't want to miss:


If eco-friendly or "green" scrapbooking is new to you, have a look at The EcoScrapbooker Manifesto to help get you started on a path to becoming a more eco-conscious scrapbooker:

The EcoScrapbooker Manifesto

This is the final Snap.Scrap.Blog.Tweet post since I've moved over to EcoScrapbook. You can find me actively blogging over there. You can also follow me on Twitter or show your support on Facebook. Thanks! ~Danielle

Thursday, January 6, 2011

Kids Craft Idea: Upcycled Toy Storage Containers

Toys! They are everywhere in my house! What is the perfect solution? Instead of recycling all those cat litter containers, turn them into toy storage!


During a recent bedroom remodel, as I sorted through the teeny, tiny to the large and in the way kind of toys, I knew my two daughters needed more storage space. Then I thought of the cat litter containers that I've been saving for the perfect decoupage moment and I found it.


I love to scrapbook, but I also enjoy getting messy with gooey and sticky decoupage. And better yet, I could enlist the help of my children to assist me with my latest Glue Dots project.

Supplies:

  • 4 cat litter containers, clean & dry
  • Glue Dots® Dot N' Go: Removable & Poster
  • decoupage
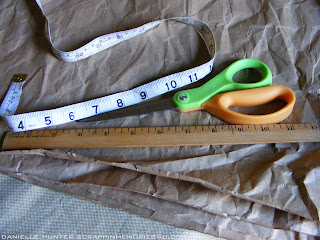
  • kraft paper (leftover from Christmas packages)
  • scissors/paper trimmer
  • tape measure/ruler
  • assorted cardstock
  • circle punch
  • acrylic paint
  • paint brushes
  • markers

1. Measure containers and cut kraft paper to size.


2. Apply decoupage in small sections and adhere the kraft paper to each plastic container, smoothing the paper as you go. (I chose to keep the paper crinkled since it was faster and easier to do with children. If you prefer a smoother surface like I did on my puzzle photo blocks, see the variations at the bottom of this post.) Trim the edges as necessary and apply a top coat of decoupage, paying close attention to the edges. Let dry.

3. Paint over the kraft paper and allow drying time.

4. Punch out several circles of coordinating cardstock and adhere each circle to the containers with the Removable Glue Dots® Dot N' Go (This was a perfect task for my two-year-old). By using Removable Glue Dots®, the design can easily be changed in the future.


5. Create labels for each container or download and print the photo below. Use a paper trimmer to cut the labels and have your child use markers to color them.

Print full size on 8.5 x 11 white cardstock. Yes, you have permission to use the above labels for personal use.
6. Adhere the labels to the storage containers using Poster Glue Dots®, which can be removed for new labels as toys come and go.


And there you have it! An easy, eco-friendly craft to do with your children on a weekend that serves a mighty purpose...toy organization!

Variations: 
  • Cut the kraft paper in small sections and use decoupage to apply each to the container, smoothing and removing bubbles before applying the next piece. Also see Thinking about life and a decoupaged door, where I show my decoupaged scrapbook storage container.
  • Lightly sand, prime and paint the plastic storage containers instead of using decoupage.

Thanks for stopping by Snap.Scrap.Blog.Tweet!

You may also be interested in:


Disclosure: I wrote this blog post while participating on the Glue Dots design team.

Thursday, November 4, 2010

Photo Puzzle Blocks: A Perfect Gift for (Almost) All Ages

Q: What happens when photos, paper and Glue Dots® get together with wood blocks? 
A: A photo puzzle is born!


These photo puzzle blocks make the perfect gift for kids 3 to 93! The puzzle is easy to make and can be completed in a few hours, including drying time. Here's what you'll need to do:

Gather Supplies:

1. Cut a photograph into 12 1" squares.
 
2. Adhere the squares to the wood blocks by placing one Craft Glue Dot® into the center of each square and Mini Glue Dots® on each corner.
 
3. Repeat Steps 1 & 2 with the remaining photographs and paper.
 
4. Gently sand the edges of each wood block. (This is optional, but will help clean up the edges and mask imperfections.)
 
5. Brush a light coat of decoupage onto the blocks to seal them and let dry. Repeat if necessary.

A simple and thoughtful gift for children or loved ones, photo puzzle blocks are sure to provide a few smiles and endless fun.

Thanks for stopping by ScrappinMemories4U.com! Be sure to visit tomorrow for my weekly Twitter post which will feature design team calls!

You may also be interested in:
Disclosure: I wrote this blog post while participating on the Glue Dots design team.

Posted by Picasa

Tuesday, September 14, 2010

How to make business card bookmarks using recycled scrapbook paper


If you're like me and own a small business with a limited budget, this project is for you. In the past, I've ordered business cards from Vistaprint with great results, but had to wait a few weeks to receive them since I chose the the slowest, yet cheapest shipping option available. Due to an upcoming craft show, I needed something fast and wanted more design options so I opted to make my own business cards, but with a unique twist.

Since I'm a scrapbooker and try to be environmentally conscious as much as possible, I decided to create business card bookmarks and print them on recycled paper. By doing this, I saved money, virgin paper and didn't have to worry about the environmental impacts of shipping the business cards.

Do you want to know how I made my business cards? Follow the simple instructions below and you can make your own business card bookmarks too!

Supplies:

1. Create a new label template in a word processing application. Input the label width (4") and height (1.5") to be able to print 14 business card bookmarks per sheet of paper.

2. Type up your business information to fit into the label. Copy and paste the information until all 14 labels are complete. Save and print.


3. Use a paper trimmer to cut each business card bookmark.


4. Punch a hole in the center of one end of the business card bookmark. Repeat.


5. Fold your pre-cut ribbon in half and insert into the punched hole.


6. Take the two end pieces through the loop and gently pull until you have a knot at the end of the business card bookmark.


7. Clean up the ribbon edges with scissors if necessary. Repeat until all the business card bookmarks are complete.


And there you have it! A simple, crafty and inexpensive way to promote your small business:


Thanks for stopping by ScrappinMemories4U.com!

You may also be interested in:

Wednesday, April 21, 2010

11 ways to be an eco-friendly scrapbooker

How can scrapbookers be eco-friendly and consume massive amounts of paper? The arts and crafts industry has begun to take steps toward greener scrapbooking options by offering supplies using recycled and sustainable resources. Scrapbookers now have choices to allow room for eco-friendly crafting. Here are eleven simple ways to become a green, eco-friendly scrapbooker:

  1. Save paper scraps.
  2. Decorate scrapbook pages with gifts.
  3. Keep layouts warm with old clothes.
  4. Dig into the recycling bin.
  5. Shop at green craft companies.
  6. Stock up on recycled paper.
  7. Add recycled plastic to scrapbooks.
  8. Stick things together with eco-friendly glue.
  9. Use non-traditional scrapbook albums.
  10. Create a recycled craft space.
  11. Become a digital scrapbooker.

Read the entire article, Green scrapbooking: Ways to be an eco-friendly scrapbooker, here.