Showing posts with label scrapbook layout. Show all posts

Wednesday, August 17, 2011

Scrapbooking Your Life in Twenty Pages

Note: As of September 1, 2011, I will no longer be blogging at Snap.Scrap.Blog.Tweet in order to focus on my other blog. If you haven't done so already, please visit the EcoScrapbook blog, browse for a bit, check out my new blog banner and subscribe to continue receiving inspiration from yours truly. See you on the other side!

Imagine holding one twenty-page scrapbook in your hands. Imagine that the scrapbook contained highlights from your life. 

Could you create a scrapbook of your life in only twenty pages?

I recently embarked on the challenge of scrapbooking someone's life into one album...and I did it in less than 24 hours. One weekend. No children to attend to. It can be done.

Here are some of the highlights from that twenty-page scrapbook:

Life Scrapbook MemoryWorks-1

Life Scrapbook MemoryWorks-2

Life Scrapbook MemoryWorks-16

Life Scrapbook MemoryWorks-14

Life Scrapbook MemoryWorks-13

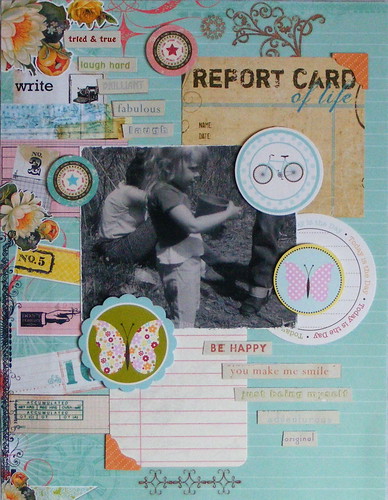
Supplies: Simple Stories Kits (Life Documented, Destinations), Jillibean Soup diecuts, Pink Paislee (Daily Junque) cardstock, My Mind's Eye cardstock and diecuts, K&Company emphemera, Glue Dots. 

Contact me to order Simple Stories and the other supplies you see above (not including K&Company). MemoryWorks offers a huge assortment of scrapbooking supplies, including products that are eco-friendly.

You may also be interested in:


Tuesday, February 1, 2011

Color Inspiration: A Yellow & Gray Scrapbook Layout

12x12 Scrapbook Layout: "Sisters"

I love when I have an idea for a scrapbook layout and I'm able to bring it to fruition without getting sidetracked or changing the design along the way. For my third ScrapTiffany challenge, I needed to create a scrapbook page with the colors yellow and gray. I knew I wanted to use black and white photographs and keep the layout simple. 

With a vision of yellow paper flowers, I sifted through my 10 gallon container of scraps and found a perfect piece of yellow cardstock. After making the flowers, I doodled grass and stems onto white cardstock. Then I matted the white square with black cardstock and added a 12x12 sheet of gray cardstock to bring it all together. I adhered my photos and wrote down the title and date. Done! (And in less than an hour!)

There are more yellow and gray scrapbook layouts and cards over at the ScrapTiffany Blog. Go check them out!

Thanks for stopping by Snap.Scrap.Blog.Tweet!

You may also be interested in:

Saturday, January 15, 2011

Sketches Can be a Pain in the Buttisimo

I've said it before and I'll say it again: "I don't like sketches!" I could probably dish them out, but I lose my scrapbooking mojo and get that feeling of nails scratching on a chalkboard when I have to attempt another sketch. I like to do my own thing and that's usually whatever the photos tell me to do. 

Yes! Photos talk to me telepathically! They say "put me there" or "crop me this way" or "use these colors."

But I still do sketches and even though I don't like them, I like the challenge and the learning experience...and my first ScrapTiffany sketch was definitely a challenge:


This is my take on the sketch:


I used part of the contact sheet on the layout because it just worked and shows other photos from the same day (even though some of the photos are flipped the wrong way). I  also doodled in place of the stitching on the sketch and "F is for fun" because my family had a blast at a Toledo Mudhens game on Father's Day 2010:


Here's a closer look of one of the flowers: 


You can see other scrapbook layouts and cards created from the sketch on the ScrapTiffany blog. And if you ever lose your scrapbooking mojo, read Eric's Load of Scrap series on Finding Your Scrapbooking Mojo (the link goes to Part 3).

Thanks for stopping by Snap.Scrap.Blog.Tweet!

You may also be interested in:

Thursday, December 30, 2010

My Top 10 Blog Posts of 2010

The first scrapbook layout I posted on my blog.
I've been a scrapbook blogger for almost a year now and it's been educational and crazy (the good crazy, not the crazy crazy). I can't even begin to list everything I've learned and all the people who have inspired me during 2010. This blog has helped me create a regular schedule of scrapbooking, crafting and writing - all activities that make me happy. It's also been fun to see what blog posts have brought me the most traffic. See for yourself:

1. Pregnancy Scrapbook Layouts: Documenting 9 Months 
Pregnancy. Nine months that will change your body and life forever. Nine months that go by fast and slow at the same time. Nine months of allowing a little human to grow inside your belly. Read more...

2. Baby Scrapbook Layouts: Journaling to remember your baby's special moments
Babies! They are so cute and cuddly when they aren't stinky. They grow so fast and before you know it, what was once helpless in your arms is now toddling around, eating Cheerios with a dash of dog hair off the floor. So grab your camera and take lots and lots and lots of photos! Read more...

3. Scrapbook Layouts that Celebrate Children
Browsing through any online scrapbook page gallery, you will find an abundance of child-themed layouts. As a parent of two beautiful little girls, I have taken thousands of photos during the eight years I've been a mom and have created hundreds of childhood scrapbook pages. Read more...
 
4. Birthday Scrapbook Layouts & Party Photo Tips
One of my favorite things to do after a birthday party is let my children play with the balloon decorations. They get crazy and have loads of fun while I take dozens of photos. Read more...
 
5. Nail Polish Drive Update: What's in your nail polish?
I'm proud to announce that my daughter has collected approximately 225 nail polish bottles to donate to Chemwise, Inc. Read more...
 
6. The Retweetables: 9 Scrappy Tweets
Why do crafty people have to tweet such good stuff? Tweets like these are why I'm addicted to Twitter Read more...
 
7. Scrapbooking in Ohio and Michigan: 2010 Crops, Retreats, Conventions and More
March 11-14, 2010, Scrapbooking Retreat Weekend, Trout Creek in Harbor Springs, Michigan, $186-237 weekend Read more...
 
8. 2010 Scrapbooking Conventions & Trade Shows
There is a scrapbook convention coming to a city near you Read more...
 
9. Mix a little gore with a few screams, add a dash of sparkle and you have a scrapbook layout
Q: What happens when your child wants to be a serial killer? A: You grab a camera, snap a few photos and create a gorey scrapbook layout. Read more...
 
10. Glue Dots Design Team Announcement: Congrats new Dottesses & Dotties
Just a quick announcement: I'M A GLUE DOTS DOTTESS! I found out a few days ago on Twitter when I saw this tweet Read more... 
 
Thanks for supporting me and my blog in 2010! Hope to see you in 2011! Happy New Year!


Thursday, December 16, 2010

How did I get 28 photos onto one scrapbook page?


Inspiration struck when a scrapbooking challenge was presented to me by If It's Groovy. The goal was to create a scrapbook page using the dictionary, which turned into an unexpected twist: 28 photos on one 12x12 traditional scrapbook layout (not part of the challenge, which was also supposed to include a word that we didn't know, but I seemed to forget that little tidbit, although I did find out that the word "zoo" wasn't used until 1847...does that count?).

So, how did I get 28 photos onto one scrapbook page? Two words: photo collages. Printing little 4x6 photo collages not only saves money, but are also perfect for all those not so good quality cell phone camera pics. I may not always have my digital camera on hand, but I always carry my Blackberry and have created several scrapbook layouts using the photos I've taken from it. Here's a couple of them:

Riding around in a golf cart.
The large sketch-like photo was taken from my Blackberry and edited in Picasa.
Thanks for stopping by Snap.Scrap.Blog.Tweet! Visit next week when I share a couple mini scrapbook albums that I created as birthday and Christmas gifts.

Posted by Picasa

Tuesday, November 30, 2010

A Scrapbook Challenge: Celebrating Graduation

I'm a procrastinator and almost always wait until the last minute to complete a project like the one I started and finished today (I had all month to work on this). I participated in a little Fiskateer's Challenge called "November Baker's Dozen in Honor of Bronwyn." (Bronwyn is a fellow Fiskateer who recently finished her university classes.) Take a look at my graduation scrapbook layout:


Our challenge was to create a scrapbook layout with a variety of specific techniques chosen by participants and I incorporated them all:

1. Blue Ribbon (award ribbon): I used blue ribbon with flower embellishments to appear like an award ribbon, then I placed it sideways on the layout.

2. Place Setting: I didn't have ANY embellishments of place settings to add to my layout, so I improvised and ended up cutting out dishes from a Bed Bath & Beyond advertisement.

3. Centerpiece (vase of flowers): I did find a vase of flowers in my assortment of embellishments, but they were pink and didn't coordinate with the other page elements. I ended up using a large flower die-cut with transparent vellum, wire and a bow.

4. Stamps:  During a recent shopping trip to Michael's craft store, I browsed the clearance section and found a cute little calendar stamp that I used to display my college graduation date.

5. Tablecloth: I used two pieces of fabric, denim and lace, on the layout for this technique.

6. Dessert: See the large photo of cake? This is my dessert...yummy!

7. Napkin: Refer to #2 and the Bed Bath & Beyond advertisement.

8. Brown and white embellishments: There's a mixture of brown and white colors throughout the layout.

9. Recipe: I chose to journal a recipe for how to graduate from college (4 years + books + studying + a dash of fun = college degree).

10. Distressing: This was an easy one since I LOVE to distress edges of paper.

11. Bubbly (glitter, shiny): The background paper I chose is covered in glitter.

12. Fiskars border punch: I used my border punch on the photo mats.

13. Chipboard: A little definition of gratitude on chipboard made an excellent addition to this layout and expresses appreciation to my parents for putting me through college.

What a challenge! I had to improvise a bit, but it was fun to create a layout using photos that weren't on my current list of scrapbooking things to do. Hope you liked it!

Thanks for stopping by Snap.Scrap.Blog.Tweet!

You may also be interested in:

Monday, November 22, 2010

What are naked Barbies doing with my favorite scrapbooking supplies?


You may think I'm crazy and my family definitely thought I was weird posing naked Barbies with my favorite and most essential scrapbooking accessories, but when I have an idea, it constantly gnaws at me until I bring it to fruition.

During my photo shoot with Barbie and the gang, I had some minor issues with the scrapbooking supplies staying in place until I used Removable Glue Dots® to keep things where they need to be and not have any exposed body parts. I also think that Ken may have been drunk because he kept falling over, but I did manage to get the shot I was looking for:


Each Barbie doll is holding one of my favorite scrapbooking tools. They are the four tools that I often turn to when I scrapbook and I couldn't imagine my life without Glue Dots®, an edge distresser, a black marker and scissors.

1. Pop Up Glue Dots®: The one thing that traditional scrapbooking has over digital scrapbooking is the ability to add real dimension to a scrapbook layout and this is easily done with Pop Up Glue Dots®. Yes, I have seen digital layouts that look like something pops off a page, but as a tactile person, I am disappointed when I can't feel it or see the space between the elements.


2. Heidi Swapp Edge Distresser: When I purchased my Heidi Swapp Edge Distresser from MemoryWorks in 2007, my scrapbooking style began to change and now a page doesn't feel complete unless I've distressed the edges of photo mats, background paper or other embellishment. (I haven't been able to find this particular edge distresser in stores anymore, but Tim Holtz has a really cool paper distresser that I'm thinking about getting soon.)


3. American Crafts Memory Marker: I've scrapbooked for many years and have tried several different writing tools, but I have found the AC Memory Marker to work the best. It's great for writing, doodling, inking paper edges and it dries fast.


4. Fiskars Scissors: Every scrapbooker needs a good pair of scissors and you can always count on Fiskars for quality sheers. I love to make my own embellishments or alter paper and find that a brand new pair of scissors can do the job with precision.


Although it's not showcased with the naked Barbies, another essential scrapbooking item is paper. I love scrapbook paper, notecards and other paper embellishments and enjoy playing with all that pretty goodness. The scrapbooking supplies shown in the layout were purchased from MemoryWorks except the white cardstock by Georgia Pacific (which can be found in the office supply section of most big box stores).

Thanks for stopping by Snap.Scrap.Blog.Tweet!

You may also be interested in:


 Disclosure: I wrote this blog post while participating on the Glue Dots design team. Links going to Amazon.com are part of an affiliate program.

Posted by Picasa

Thursday, November 11, 2010

The Retweetables: Wedding & Anniversary Scrapbooks

"This is what marriage really means: 
helping one another to reach the full status of being persons, responsible beings who do not run away from life."
- Paul Tournier, Swiss physician and writer


This week's Twitter post was inspired by a tweet from @DaisyTrail who shared a link to Wedding Scrapbook Ideas, an article at LoveToKnow. If you are thinking about taking on a wedding scrapbook in the future, I highly recommend reading this article before beginning your project. There are several useful tips about journaling, memorabilia and embellishments that will help you create a beautiful wedding scrapbook (and it was from this site that I found a link to the marriage quote above).

Another wedding-related tweet I spotted was by @ClarkMKane, who shared the article, How to make a wedding anniversary scrapbook. This tweet made me think of my ten year wedding anniversary. Over the past several months, I've gathered together all the photos of my husband and I before  we had children and now I'm waiting for the perfect time to start my love scrapbook (it's love since it's not a true wedding scrapbook or anniversary one, just our early years together). 

I did, however, create a digital scrapbook layout in Picasa about what we did for our recent wedding anniversary. (We went to the Belamere Suites in Perrysburg, Ohio and had THE BEST TIME relaxing, swimming in our private indoor pool and a few other things that married couples do.  Anyway, we can't wait to go there again...a perfect getaway without really getting away.)


You may also be interested in:


Note: I've had to add word verification for comments since I've been receiving a lot of spam. Sorry about the inconvenience.


Monday, November 1, 2010

The Final #LOAD: 31 Layouts in October


Yesterday was the last day of October's Layout A Day. I completed 31 layouts in 31 days just like I did in May and couldn't be more proud, relieved and sad all at the same time. After having a set routine for an entire month, the day after is a bit of a shock. But it's okay. I have other projects to work on, dishes that needed to be washed, laundry that needed to be put away (that took me about 45 minutes since it had been neglected for about a week) and I was able to spend a little more time just hanging out with my two-year-old.

I love LOAD because I get a lot of scrapbooking done in a short amount of time and I'm able to meet and be inspired by other LOAD participants. A perfect combination and I'm looking forward to another LOAD in February.

So, what did I learn? (As seen in the layout above, which also made it to Flickr's Explore gallery yesterday!!)

  • Scraps of paper can turn into a beautiful layout.
  • Sometimes when I don't think my layout is great, someone else does.
  • I still have issues with sketches.
  • I need to focus more on telling a story.
  • Q&A pages are fun to do.
  • Two words can spark an idea that you didn't see coming.
  • Quotes are perfect for scrapbook pages.
  • Conversations can make a layout.
  • There's a story in my inbox.
  • It's okay to journal just the facts.
  • 12x12 layouts are my comfort zone.
  • If I don't have the perfect supplies, I make them.
  • I don't have to wait for the perfect product or photo.
  • I love black & white layouts with a pop of color.
  • I'm getting more comfortable with digital scrapbooking.
  • I don't need fancy digital templates to create digital scrapbook pages.
  • I can tell a story with product.
  • I love to make pages for my daughters.
  • I want to scrapbook more photos from my childhood.
  • You don't need photos to make a scrapbook page.
  • It feels good to distress and tear paper.
  • Some photos are great in color, but not in black & white and vice versa.
  • Journaling doesn't need to look perfect.
  • Sometimes a photo is all you need to tell a story.
  • I want to do more "then & now" pages.
  • There is still so much more to learn.
  • There is still so much more to scrap.
Thanks for stopping by ScrappinMemories4U.com! View all of my LOAD layouts on Flickr HERE.

You may also be interested in:


Posted by Picasa

Friday, October 15, 2010

Halfway Through Layout A Day (#LOAD)


I'm on Day 15 of October's Layout A Day and proud to say that I haven't missed a challenge yet. Today's challenge was to use items that don't normally go together. In the layout above, I used flowers and the color pink on a page with men. It works and I like it. The photo is meaningful since it showcases three generations and I believe that it was the first time that these three men had a photo taken together. 

The man on the left is my father-in-law and I recently created a website for his business, Consolidated Hunter: Heating, Plumbing & Air Conditioning. I did it through Blogger and tweaked it to make it look like a website. I would love it if you checked it out and let me know what you think. It's my first attempt at web design (besides this blog).

As always, thanks for stopping by ScrappinMemories4U.com! See the rest of my #LOAD layouts on Flickr.

You may also be interested in:


Posted by Picasa

Thursday, October 14, 2010

The Retweetables: Halloween Edition (Part Two)


 This was me. A clown. Not one of my favorite costumes as a child, but to tell the truth, I chose this photo since the quality was better than the other ones I browsed through this morning. My mom created a HUGE scrapbook for me when I turned 30 and then filled a large photo album with all the other photos that couldn't fit into the scrapbook. So as I was looking through the album, I debated between the photos of me as a punk rocker, a witch with a green face and a few others. I like the photo I chose because it brings back memories of my blue tennis shoes with velcro, the big orange rocking chair that sat atop our red carpeting and the brick fireplace that I ran into right before I started kindergarten (and ended up with a horribly bruised ear). At least the carpet brings out my face paint and the red polka dots on my costume.

Since I'm on the subject of face paint and costumes, check out this week's #Retweetable Halloween tweeters:
Other noteworthy tweets that aren't Halloween related, but I had to share:
Thanks for stopping by ScrappinMemories4U.com! Follow @OhioDanielle on Twitter to stay updated on future blog posts.

Note: The above layout was created for Day 14 of Layout A Day (LOAD) and scraplifted from the January/February 2007 issue of Simple Scrapbooks (our challenge was to use something old). You can view my LOAD photostream on Flickr.

You may also be interested in:


Thursday, October 7, 2010

The Retweetables: Halloween Edition

Meet my serial killer daughter. Three years ago, my sweet little four-year-old wanted to dress up as Scream and I let her. Afterall, she refused to look at other costumes and insisted on this one. So, I HAD to make a scrapbook page. (I totally scraplifted the layout from a book I read in 2007. I wish I could remember which one, but that was three years ago and I didn't keep track of things like I do now. If you've seen a layout like this and know who created it, please let me know.)

Okay, back to the bloody layout. Let's open it up to see a "murder"...


(The pop-up element was not part of the scraplift. I had to figure that one out all on my own. Anyway...) Here's the terrifying and fictional story about a young girl, turned serial killer...


Note: After showing my daughter (now 7) my last blog post, Mix a little gore with a few screams, add a dash of sparkle and you have a scrapbook layout, she confessed that she didn't know that Scream was a serial killer. She thought that he just chased people around to scare them.

Since we are on the subject of Halloween, I thought I'd share some Halloweenie tweets with all of you. [I've also added a little commentary to the tweets.]

  • @scrapbooktrends: Our Halloween Spooktacular is is full swing! Be sure to swing by our blog, look for the Spooktacular banner on... http://fb.me/KFbqHApM [There are soooo many fun Halloween projects on this blog and a contest that ends tonight 10/7/10.]
  • @ArtistTaraReed: Scare up some fab paper crafts for Halloween with new stamp sets for Technique Tuesday! | Tara Reed Designs http://ht.ly/2OWYw [These are so cute!]
  • @mmscrapshoppe: Spooky Chic Halloween Wreath: I love purple and black together for Halloween. I think they look subtly spooky toge... http://bit.ly/dlXG8R [The skull is freaky!]
  • @FamilyFun: Have a bewitching #Halloween party with the help of these fun Halloween games and make the party go off with a scream! http://bit.ly/9AQGxs [Loads of fun stuff here!]
  • @craft: Printable Rainbow Owl Mobile:   Here's a fun printable you can use to add some color and whimsy to any corner of a... http://bit.ly/drytK4 [This is adorable and great for Halloween. It's not spooky and you can even decorate a nursery with it. For directions and more free downloads, go to http://www.minieco.co.uk/hoot-hoot/]
Oh, what crafty goodness! I'm so glad I can turn to Twitter for endless ideas and creativity. I hope you have enjoyed these tweets too! Thanks for stopping by ScrappinMemories4U.com. Follow @ohiodanielle on Twitter to stay updated on The Retweetables.

You may also be interested in:


Posted by Picasa

Tuesday, October 5, 2010

Mix a little gore with a few screams, add a dash of sparkle and you have a scrapbook layout

Q: What happens when your child wants to be a serial killer?
A: You grab a camera, snap a few photos and create a gory scrapbook layout.

My oldest daughter (age 7) has always enjoyed watching scary movies, but when she chose the Scream costume as a preschooler, I was a bit surprised. She had never viewed that particular movie before, but after walking through the costume store, she insisted on being a serial killer. The costume was too big for her, but I made it work to make her happy. This wasn't a regular Scream mask. It was connected to a heart that pumped blood into the mask. She proudly wore it Trick-or-Treating.

Through the years, my daughter continued wearing a variety of masks and it didn't have to be Halloween for her to do so. When my youngest daughter was old enough to be scared, a masked girl chased her little sister around the house and masks have terrified my two-year-old ever since. The scrapbook layout I'm about to show you tells the story of a little girl and her scary masks.

Supplies:
  • Glue Dots® adhesive: Pop Up, Mini, Continuous Line, Memory Book
  • Paper: DCWV, Paperbilities, American Crafts, The Paper Company, scraps
  • The Craft Lounge Sparkly Fluff
  • Making Memories ink and letter stamps
  • American Crafts marker
  • Sakura Gelly Roll pen
  • Deco Art acrylic paint
  • wire
  • button

Step 1: Create a bloody background page. Slice open your hand and drip blood on a nice sheet of white cardstock...or use red acrylic paint like I did. Let dry for several hours.


Step 2: Make a mini serial killer hold a bloody banner. After cutting out a little white mask and black cloak, attach the face with a Pop Up Glue Dot®.


Using two pieces of scrap paper, create a pop-up banner. One piece will be for the title and the other for a background. Drip "blood" onto the title.


Attach wire to the background paper with Pop Up Glue Dots® and place the title on top.


Step 3: Balance the gore with a little Sparkly Fluff. Carefully take a strip of Mini Glue Dots® and adhere to a piece of scrap patterned paper.


 Repeat two more times.


Sprinkle Sparkly Fluff over the Mini Glue Dots® and shake off the excess.

Step 4: Mix together the gore with a few screams, add the sparkle and you have a bloody and kinda scary scrapbook layout.


Bonus Step: Make a pocket for your gruesome mask stories. Place Continuous Glue Lines® on the back edges of your matted photo block and adhere to the layout.


Insert your journaling and the gorey scrapbook layout is complete!


Thanks for stopping by ScrappinMemories4U.com! Be sure to visit this Thursday for The Retweetables: Halloween Edition and to see another layout that will make you SCREAM!

Disclosure: I wrote this blog post while participating on the Glue Dots design team.

You may also be interested in:
Posted by Picasa